
Development Time Ratio
I occasionally see discussions online of Development Time Ratio (DTR) and a recent discussion on the Barista Hustle Facebook Group motivated me to write about this at length.
I wrote The Coffee Roaster’s Companion in mid-2014. At the time, most specialty roasters were not yet using Cropster or other software, underdevelopment or and baked roasts were the norm (baked still is, but more on that another time), and roasters were routinely discussing development time but no one had ever, to my knowledge, referred to development time ratio. Likewise, I was not aware of anyone proposing that the ROR should always decrease during a roast (it should). After twenty years of roasting beans on a variety of machines, I had many such ideas to share. I couldn’t discuss them in too much detail, though, lest the book become confusing to readers. As it is, I receive a fair amount of mail from confused readers seeking clarification.
At the time of writing CRC, almost all curves I’d seen from other roasters and new clients looked something like the following curve, which I’ll call “The Crash and Flick"
big crash and flick, 23%
Given that backdrop, it was important to propose some basic guidelines that anyone could follow easily, with any roasting machine. I didn’t intend the book to dive into roasting theory to the depth that I would go into with a client; my goal was to offer a foundation on which roasters could build ideas and discussions about roasting. Prior to publication, there was precious little open discussion of roasting among professionals.
I designed the guidelines with the typical small specialty roaster in mind: someone using a classic drum roaster, charging with >60% of capacity, and dropping the coffee between the end of first crack and the beginning of second crack.I think that described the vast majority of professional roasters at the time.
I chose 20%—25% because:
- They’re round numbers that work well with most medium and light/medium roasts that dominated specialty coffee at the time.
- Of the 20,000+ roasts I’d tasted over the years for which I had access to bean-temperature data (several from a few of the best roasting companies in North America), probably 18 out of the best 20 happened to have a DTR of 20%—25%.That’s not “proof” of anything, but it’s a correlation that gave me the confidence to make the broad recommendation of 20%—25%. Please note that 20 out of 20,000 represented the top 0.1%; these were not just “good” roasts, they were extraordinary. My goal has always been to study and practice the methods that produce exceptional coffee, not just to roast good coffee.
These days I still prefer a 20%—25% DTR for most roast levels between the end of first crack and the beginning of second crack. Of course, I’ve had excellent roasts with DTRs below 20%, but none have cracked (no pun intended) that top 20.
Many roasters have opined that they don’t often like their roasts at DTRs above 20%. Some have posited such sweeping generalizations as “higher DTRs create less body”, which is rubbish. In my experience, roast degree and development, not DTR, are what determine body.If a roast’s DTR is 20% but not well developed, it likely will lack body.
DTR is not a guarantee of development; it’s simply one of many indicators of how a roast progressed. It’s a handy rule of thumb, and one that can be broken successfully, but like most rules, one probably shouldn’t break it before mastering it.
For example, if your roast curve looks like the Crash & Flick curve shown above, and you blame the roast’s baked (flat, cardboard, straw-like), underdeveloped, or roasty flavors on the DTR, you’re missing the point that DTR is just one piece of a complex puzzle.
There’s one major exception worth noting:if the ratio of your burner capacity to batch size is high enough, the target DTR range should probably decrease. For example, it would be reasonable to use a DTR of 15% when roasting 10kg of coffee in a Probat UG22.However, it would be more difficult to roast a high-quality 20kg batch in the same machine with a 15% DTR. This relationship will partially explain for some readers why they can easily develop coffee using a much lower DTR in a sample roaster than they can in a production roaster.
For those who protest that it’s not possible to achieve a good roast with a20%—25% DTR in a reasonable roast time, here are a few examples.In future blog posts I’ll explore how to achieve such roasts in virtually any machine, and with almost any coffee. Until then, feast your eyes on these lovely curves :)
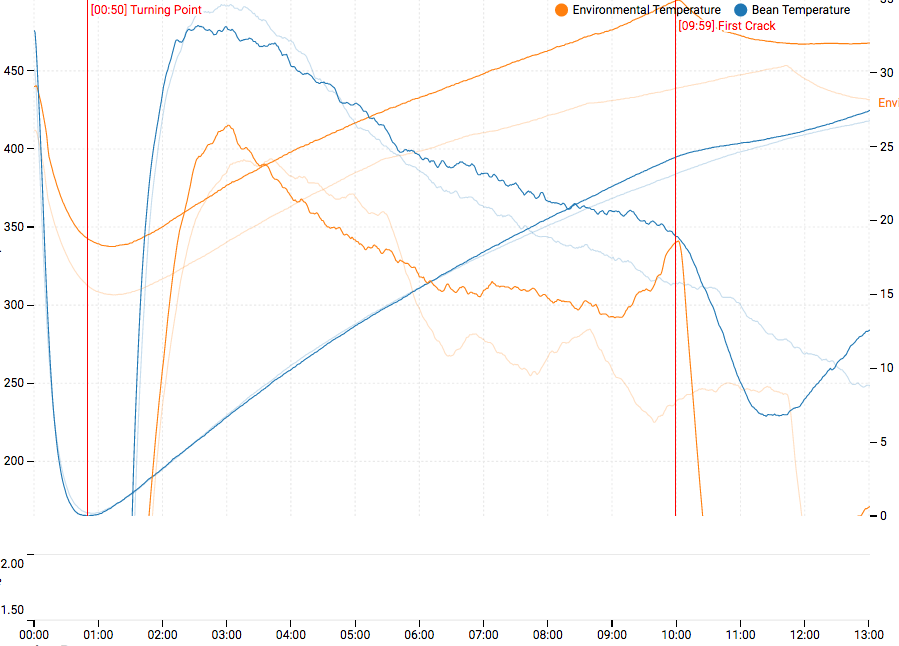
This is a 22% DTR from Ben Tooveyof Genovese Coffee in Melbourne.I’ve been working with Ben through email for a short time and he’s rapidly achieved great control over his ROR curves. This curve was roasted on a customised 5kg STA Impianti, an indirectly heated roaster.

Ben 22%
Below is a lovely 21% DTR roast from client Jackie Suiter of Kona Coffee Purveyors in Honolulu. Jackie roasts on a Giesen W15.I’ve shared Ben and Jackie’s curves to illustrate similar, excellent curves with quite different roasting machines.

smooth 21% DTR
NB: Please do not try to mimic these temperatures and times in your own roaster; it is very unlikely the numbers shown in these curves are appropriate for your machine, probe, and batch size.
Roasting is quite complex. I hope roasters carefully test new methods over the course of hundreds, if not thousands, of batches, before drawing conclusions, or critiquing those methods online. If we embrace that approach as an industry, we will move forward more steadily. I did not intend the recommendations in my book to be the final words on roasting; I meant them to be the first words of an open, much-needed, professional-level discussion about roasting. I’ve started this new blog in hopes of furthering that conversation. Welcome and thanks for reading.